starclick

Friday, 19 April 2013

No Display With Long Beep Problem
Some times we will face No display problems. At the same time Computer generates some Beeps. If you have basic idea on computers, This type of Problems are very easy to solve.


Generally sounds or beeps are come from Motherboard speaker. The speaker generates some beeps to show the motherboard error. so the long beep also one the error. Long beep error means that Problem with RAM. so check your RAM, is it connected with loose contact or not working.

To check the RAM, Open the left side door of the CPU, find the RAM and unlock the RAM slots, then remove the RAM. Clean the RAM and Reinsert the RAM for 2 to 3 times to RAM Slot for 2 to 3 times and start the computer. otherwise change the RAM and start the computer.
Why My Computer Is Running Very Slow


My computer is very slow. How to increase my computer speed. Sometimes office systems and our own laptops irritate us with their slow running in emergency time. Here is the quick speedup guide for slow computer users.


For instant speedup, there are two tasks you have to do. Close all the running services and delete all temporary files. Both are very important and easy for quick speedup.

To close the current services, go to task manager (right click on taskbar and click task manager), select processes tab and right click on current user unwanted services and click on end process button. Except explorer.exe, you can close all the current user services. When you click end process button you get conformation windows, just click yes. After you close all the services except explorer, system speed will better than before.
Second is delete temporary file. Go to start menu, open run and command as recent and delete all recent files, at the same way enter commands temp, prefetch, %temp% and delete all temp, prefetch, %temp% files.


These two tasks are enough to speedup you system or laptop quickly

 What Causes Computer Systems to Heat Up

While most components in your computer system generate heat, some components cause more heat than others.
For example, your Central Processing Unit (CPU) which is most in use even during normal operations is one of the main components that needs proper cooling to stay functional. Your Graphics Card (Graphics Processing Unit, GPU,) also needs special cooling, usually already built into the card itself. This is especially true for gamers, where the GPU is under a heavier load than it would normally be.

Another component that can generate large amounts of heat is the computers’ Random Access Memory (RAM). While generally this is not as much of an issue, some newer and faster RAM modules will come with a pre-assembled heat sink to help offset the extra heat that is caused by the faster speeds.
With all of these components each causing heat, they also heat each other up. A CPU’s heat might further raise the graphics card’s heat and vice versa. Heat is then dissipated through cooling mediums, including the case itself, airflow, heat sinks, etc.
Dusty Heat Sink
Above: Dusty Heat Sink
Heat can also be caused by poor airflow. If airflow is obstructed by excess dust, hot air cannot be vented out of the system, and builds up inside, as shown in the image above. Obstructed airflow can also be caused by improper orientation of fans and components being in the way.
Aside from poor airflow, improper application of thermal compounds can cause heat sinks to lose efficiency and cause more heat within the system.

So How Do You Keep Heat Under Control?

There are many ways to keep different components from overheating. I’ll go over each of the most common cooling methods used in today’s consumer computer systems — heat sinks, fans, and thermal compounds — as well as some less common cooling methods that are not yet fully mainstream, but still an important part of high-end computer systems (liquid cooling).

Heat Sinks

One of the most common cooling components is the heat sink. Heat sinks can be found on most computer components including the CPU, Graphics Cards, RAM, and other integrated circuits.
There are two types of heat sinks: passive heat sinks and active heat sinks.
CPU and chipset heat sinks
Above: CPU and chipset heat sinks
Passive heat sinks are essentially just pieces of aluminum, or more recently, copper, affixed using thermal compounds onto a computer chip that normally produces heat. Heat is then transferred through the conductive thermal compound into the metal, and is redistributed away from the chip itself. While this method works well for older CPUs and chips, newer and faster ones will require a more powerful cooling solution, such as an active heat sink.
Active heat sinks are similar to passive ones, except they have a fan attached. The fan helps to pull heat away from the heat sink allowing it to cool more effectively. You will usually see active heat sinks in graphics cards, and even larger active heat sinks in CPUs. Active heat sinks do require more care, as with the addition of a fan, dust is more susceptible to enter the heat sink and will require cleanings and care more often.

Fans

Fans, more specifically, case fans, help to cool your computer case by (usually) pulling cold air in through the front of the PC case, and blowing it out of the back.
This is not always the case though, as each PC builder has their own cooling preferences, and others may actually add in case fans causing their heating methods to be counterproductive. An example of a counterproductive fan setup would be all fans pulling air in. This can cause an excess of dust, as well as no way for heat to escape.
Case fan with blue LEDs
Above: Case fan with blue LEDs
Aside from case fans, there are also other types of fans available.
PCI slot fans, or blowers, are one way to increase the flow of air out of the back of the PC case. Hard drive (HDD) fan modules are usually made up of two small fans attached to the exposed side of an internal hard drive; this helps to pull heat away from faster or more active hard drives. Most internal power supply unites (PSUs) will have an internal fan pulling air in and another blowing air outside of the computer case. Fans can also be found as part of active heat sinks in CPUs, graphics cards, and chipsets.
The most common fan size ranges between 40mm and 140mm; though fans as large as 240mm are starting to emerge in the mass market and in specialty cases.

Water Cooling

Water cooling is generally only used in high-end systems and gaming systems.
Water dissipates heat more efficiently than heat sinks and fans. Water cooling systems consist of a pump that pumps water across multiple components within the system. Most often, water cooling systems work to actively cool the CPU and graphics card, but modular systems allow the connection to other components within the PC. Water cooling can also be much quieter than using more conventional cooling methods like fans.
Liquid cooling
Above: Liquid cooling
While there are many upsides to using water cooling, there are also a few major downsides.
Not only are water cooling systems much more complex, but they are also a more dangerous build if not done properly. Even a small leak can turn disastrous. If a leak is present, the coolant can damage internal components including the motherboard itself.

Tuesday, 16 April 2013

See Command Prompt History

You can see last used commands in a session using the navigation buttons, but if you would like to see a list of all the commands, you can get it by pressing the F7 button.
f7
Alternatively, you can use the command doskey /history  to list these commands in the command prompt itself.

Friday, 12 April 2013

Solving Improper Shutdown Problem

Sometimes we can’t shutdown the system properly by power problems and some other reasons.  Continues restarting is one of the common problems, actually several reasons for this restarting problem. But here I mentioned only solving improper shutdown problem.   


When you get above error screen shot for the first time, you have to select last known good configuration option. When you select the last known good configuration option for the first time, the problem will be solved. Otherwise you have to repair your operating system by using windows bootable CD or DVD.  


Some are format the system for this problem, but this problem is easy to repair. Follow the below steps to solve this problem.

STEPS:


  • Boot form windows XP bootable CD.
  • Select repair (press R)

  • In command prompt enter “chkdsk /r” command to check the errors.

  • Type exit to restart the system, after restart your system, windows will start  normally. 
Don’t format for this problem, if you format the system desktop and document files will be lost. So in this small cases just repair your system

Tuesday, 9 April 2013

 How to connect two computers using cross over cable,
 
To connect two computers for a LAN games or file and printer sharing, its very easy! You only need one crossover cable and two network cards.
This is wired connection approach to connect two computers through cross over cable without involving other network devices, such as switch or router. It’s effective and simple way if you want to connect the computers temporary. If the network card on computers supports auto MDI/MDIX feature, you could use crossover or straight through network cable to connect both computers. If not, crossover cable is needed.

THINGS YOU WILL NEED:
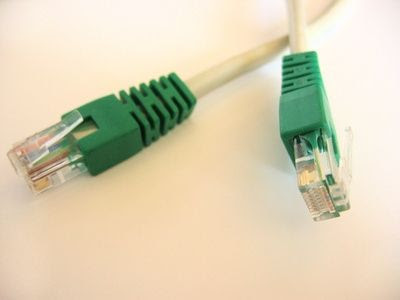
two-computer-cross-over-cable cross-over-cable
 
STEPS
1. Connect the two computers through the cable.
2. Now first we name the two Computer A and Computer B.
3. Lets go on to Computer A.
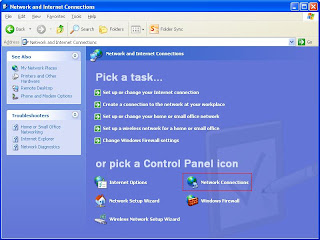
4. Go to Start> Control Panel>Network and Internet Connections and Click Network Connections
network-and-internet-connections

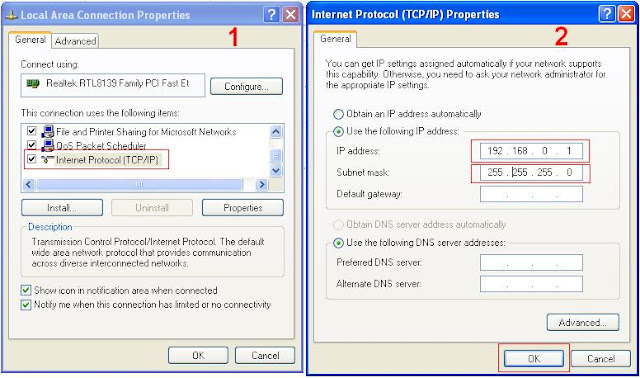
5.  Right Click Local Area Connection and Choose Properties
network-connections

6. Double click Internet Protocol(TCP/IP. Choose Use the following IP address. Set the ip address to 192.168.0.1, Subnet Mask to 255.255.255.0 and click OK
internet-protocol-properties

7. Now that we completely setup the Computer A Let's go on to Computer B
8.The same procedure here in Computer B. Follow the steps 1-6. The only difference is the ip address. Instead of 192.168.0.1 change to 192.168.0.2 and you're done.
9. To check if you are successful setting the two computers, Go on to Computer A. Go to Start>RUN and type CMD. In the black screen type ping 192.168.0.2 and press ENTER. If successful then the result should look like on the image below.

ping

WHAT YOU CAN DO AFTER SUCCESSFULLY CONNECTING THE TWO COMPUTERS:
1. You can share your file.
2. You can play LAN GAMES.
3. You can share resources like printers.

How to Speed Up Windows 7

Ways to Speed up Windows 7fast Windows 7

Windows 7, supposedly the faster of the operating systems from Microsoft, shows gradual signs of slowing down when continually used over a long stretch.
Before installing this operating system on your computer, you should make sure that your computer meets the following basic requirements:
  • Processor: 1 Ghz or faster 32-bit (x86) or 64-bit (x64)
  • RAM: 1 GB (32-bit) or 2 GB (64-bit)
  • Available Hard Disk Space: 16 GB (32-bit) or 20 GB (64-bit)
  • Graphics Device: DirectX 9 with WDDM 1.0 or a higher driver
If your computer meets the aforementioned requirements then you can go ahead and install Windows 7 on your computer.
Steps:
  • Shutting-it-down:The proper system configuration is a necessity for the speedy functioning of the system, but again it is not the only factor effecting the computer's performance. The system tends to slow down even if used over a prolonged period of time. As such, you should make sure that you give your computer a bit of "rest" at least once every week and completely shut it down.
  • Periodically delete the temporary files from your PC: This helps the applications to run faster on your system. For this type %Temp% in the run dialog box and press "OK". A new folder will open up with the name "Temp" on the top menu bar. Here click Edit–>Select All and then File–>Delete.
  • Perform a scandisk: This test checks if your drive is in a healthy condition and also helps your computer run faster.
  • Defragment the drives:Even though Windows 7 is said to be the smarter and more efficient OS, it still suffers from disk fragmentation when involving allocation of free space to files on a magnetic disk. Consequently, more time is spent when inputting/outputting the files when the disk is highly fragmented. Thus, a regular disk defragmentation is necessary.To defragment the disk goto Start–>All Programs–>Accessories–>System Tools–>Disk Defragmenter. Here, you can select the volume to be defragmented and the click "Analyze" and then "Defragment" to begin the disk defragmentation.You can select to defragment the volume one by one or all at once.

Every Admin Should Know These Commands Active Directory 1.   To quickly list all the groups in your domain, with members, run this c...