starclick

Wednesday 5 March 2014

How to Turn On Auto-Complete in the Command Prompt

Do you use the command prompt on a daily basis? If you do, then this tip is definitely for you! I recently found out that there is a way to turn on auto-complete for the command prompt via a simple registry hack. So that means if you are typing in a long path, simply type in the first few letters and then press TAB to auto-complete.
For example, if I am typing in C:\Documents and Settings\, I would just need to type inC:\Doc and then press the TAB key.

enable auto complete command prompt
dos prompt auto complete
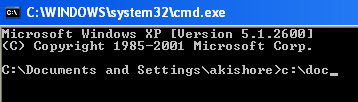
As you can see, there is only one option that starts with “doc”, so it’s automatically filled along with quotes since it has spaces in the path! Now that’s pretty neat. I always loved using auto-complete in Windows Explorer or even in Open and Save dialogs, but never knew it could be done in the command prompt also.
You can also browse through the different folders and files in a directory by simply pressing the TAB key. So if you type in C:\ and then keep pressing the tab key, you will be able to cycle through all the folders and files in that path in alphabetical order, i.e. C:\Documents and Settings, C:\Program Files\, etc.

How to enable auto-complete for command prompt

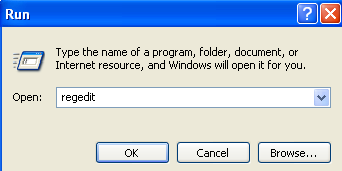
Step 1: Click on Start, then Run and type in regedit
regedit
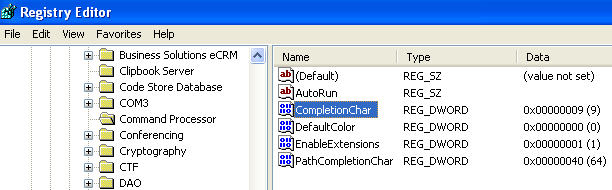
Step 2: Navigate to the following registry key:
HKEY_LOCAL_MACHINE\SOFTWARE\Microsoft\Command Processor
Step 3: Double-click on the “CompletionChar” key and change the value to 9
completionchar
Now close regedit and open the command prompt. Start typing in a partial path and then press TAB to auto-complete it! Pretty sweet eh! Great for anyone who has to work with the command prompt a lot. Enjoy!
1. Search for “Run” from the Windows Start screen and click on it to open its command prompt.
2. Type in “gpedit.msc” and click “OK.”
3. From the main screen of the Local Group Policy Editor, you want to head to the following entry:
Computer Configuration -> Administrative Templates -> Windows Component -> App Package Deployment
4. Right-click on “Allow all trusted apps to install.”
5. You’ll want to enable this entry to all non-Windows Store apps to install in Windows 8. Make sure to click “Apply,” then “OK” to change the entry’s settings.
Before you install any non-Windows Store apps, they still must meet two criteria:
  • The developer must cryptographically sign the app
  • Your computer must be able to accept the certificate
6. If the app meets these two conditions, then you’ll want to use Windows PowerShell to run the following command:
add-appxpackage C:\app1.appx –DependencyPath C:\winjs.appx
“app1.appx” is the app you want to install, you’ll need to change this as necessary depending on how it’s named.
“winjs.appx” is the dependency for the app, which you’ll also need to change if necessary. The dependency will be included with the app.
Now, you’re ready to use your new non-Windows Store app on Windows 8.
Make sure you’re only installing these apps from trusted sources and always keep aWindows 8 system recovery image or backup handy in case you run into issues.

Every Admin Should Know These Commands Active Directory 1.   To quickly list all the groups in your domain, with members, run this c...