starclick

Friday 26 April 2013

HOW TO GET MOTHERBOARD INFORMATION

If  you want to know motherboard information then you can find out motherboard information easily:
  • At first goes to start menu.
  • Then click Run menu
  • Write ''wmic" (without quotation).
  • Press ok.
  • You look, this program is automatically installing.
  • Wait some minute.
  • And in here display "WMIC:ROOT\CLI>" in command prompt option menu.


Then write "baseboard" (without quotation).
  • Press Enter.
  • So look your correct motherboard information.

1. Click start
click run
type regedit,
then click ok!

2. In The registry editor, drill down to the following key:
hklm\software\Microsoft\Windows NT\Current version\Winlogon.

3. Right click LegalNoticeCaption,
click modify,
Type: THIS IS NEXT TRICK,and then click ok!

4. Right click legalNoticeText,
click modify, and then Close your message!

5. Restart Your Computer.

6. The message will appear every time you logon!

Thursday 25 April 2013

Troubleshooting Tips for a Network Card

    • Make sure you're using the drivers that are on the driver’s disk that ships with the network interface card (NIC).
    • Make sure the driver is loaded and the protocols are bound. Check the Device Properties list for trouble indicators (an "X" or "!" symbol).
    • Test the NIC adapter with the diagnostic utilities that often came with the driver installation.
    • Check with your LAN administrator - you may need to install additional networking software.
  1. If the problem persists, follow these guidelines:
    • Make sure the cable is installed properly. The network cable must be securely attached at both RJ45 connections (adapter and hub). The maximum allowable distance from adapter to hub is 100 meters. If the cable is attached and the distance is within acceptable limits but the problem persists, try a different cable. If you're directly connecting two computers without a hub or switch, use a crossover cable.
    • Try another network cable.
    • Check the LED Lights on the NIC. Before the LEDs can be used for troubleshooting, the network interface card (NIC) must be connected to the network and the network driver must be installed. Most NICs come with LEDs near the connection. The meaning of the LED signals may be different from one manufacturer to the other. Here is a common LED description for 3COM 10/100BT dual speed NIC. Please consult your NIC manual for any difference.
LED
Description
Flashing
Steady (On)
Off
10 LNK
Green: Link integrity
Reversed polarity
Good 10BT connection
No connection between NIC & hub
100 LNK
Green: Link integrity
Reversed polarity
Good 100BT connection
No connection between NIC & hub
ACT
Yellow: Port traffic for either speed
Network traffic present
Heavy network traffic
No traffic
  1. The computer hangs when the drivers are loaded.
    • Change the PCI BIOS interrupt settings. See your NIC and system manuals for more details.
    • If you are using EMM386, it must be version 4.49 or newer.
  2. Diagnostics pass, but the connection fails or errors occur.
    • At 100BT, use Category 5 wiring and make sure that the network cable is securely attached.
    • At 100BT, connect to a 100BT hub/switch (not 100Base-T4).
    • For NetWare, make sure you specify the correct frame type in your NET.CFG file.
    • Make sure the duplex mode setting on the adapter matches the setting on the switch.
  3. The LNK LED doesn't light.
    • Make sure you've loaded the network drivers.
    • Check all connections at the adapter and the hub/switch.
    • Try another port on the hub/switch.
    • Make sure the duplex mode setting on the adapter matches the setting on the hub/switch.
    • Make sure you have the correct type of cable between the adapter and the hub. 100Base-TX requires two pairs. Some hubs require a crossover cable while others require a straight-through cable.
  4. The ACT LED doesn't light.
    • Make sure you've loaded the correct network drivers.
    • The network may be idle. Try accessing a server.
    • The adapter isn't transmitting or receiving data. Try another adapter.
    • Make sure you're using two-pair cable for TX wiring.
  5. The adapter stopped working without apparent cause.
    • Run the diagnostics program that came with the NIC.
    • Try reseating the NIC in its slot, or try a different slot if necessary.
    • The network driver files may be corrupt or missing. Remove the drivers and then reinstall them.
  6. The Wake on LAN (WOL) feature is not working.
    • Make sure the WOL cable is attached and that power is being applied to the computer.
    • Check the BIOS for its WOL setting. Some computers may need to be configured for WOL.
    • Make sure the network cable is fully attached to the adapter.
  7. Crossover cable troubleshooting tips. When you work with network cabling, concentrators (hubs or switch), and NICs from different venders, it is possible to connect everything and still have no communication between file servers and workstations.
    When there are several unknown variables, it is difficult to determine which component is broken. Use these tips to isolate the problem.
    • Determine whether your equipment complies with the 10Base-T or 100Base-TX standard. This is particularly important for hubs and switches.
    • Connect a straight-through cable from the PC to the hub. The hub performs an internal crossover so that the signal can go from TD+ to RD+ and TD- to RD- (see How to Make Network Cables). When you look at an RJ-45 connector from the front, pin 1 is identified on the left-hand side when the metal contacts are facing up.
    • Make sure that the TD+ and TD- wires are twisted together, and that the RD+ and RD- wires are twisted together. Using wires from opposing pairs can cause signals to be lost. For a 100Base-TX cable, pins #1 and #2 , and #3 and #6 must be on the same twisted strand.
  8. When there is doubt whether a hub is performing correctly, or if the impedance settings are in question, a crossover cable can help you isolate the failing component:
    • Connect a file server and a client PC back to back with a crossover cable to verify that the NIC and network operating system are properly configured.
    • To make a crossover cable, simple connect TD+ to RD+ and TD- to RD-. The cable performs the crossover that is usually performed by the hub. Make sure that two twisted-pair wires are used. If the file server and client PC function together as a small network, then either the existing cabling or the hub is the problem.
    • If there is a proper crossover, the appropriate LED comes on. If there is a straight-through connection, the LED does not light. A blinking LED indicates that there is a polarity mismatch (that is, TD+ to RD- instead of TD+ to RD+)

How to Change the Default Location for Installing Applications in Windows Xp

In Windows Xp the default location where the applications are installed is located in C:/Program Files. Sometimes you can run out of space in C: drive and it become impossible to install the programs. But there is a registry tweak which can let you install the applications in different directory of your choice.

Run the Registry editor by typing regedit in the run command box and go to

HKEY_LOCAL_MACHINE\SOFTWARE\Microsoft\Windows\CurrentVersion
HKEY_LOCAL_MACHINE

HKEY_LOCAL_MACHINE\SOFTWARE\Microsoft

HKEY_LOCAL_MACHINE\SOFTWARE\Microsoft\Windows

HKEY_LOCAL_MACHINE\SOFTWARE\Microsoft\Windows\CurrentVersion


Just look for the value named ProgramFilesDir. You will see that this value is shown as C:\Program Files by default. Now edit this value and add the location where you want to set the default installation directory. From now onwards XP will use this location as the new default installation directory.

Change Windows Xp SP2 to Sp3 and Sp2 to Sp1 easily.

  1. This can be done very easily with simple steps.
  2. Open run and type regedit.
  3. go to HKEY_LOCAL_MACHINE and System and to CurrentControlSet and to Control
  4. Find windows folder in control and then click on it to see CSD Version which is on the right side.
  5. Double click to open it and then Change the data value from 200 XP SP2 to 300 for XP SP3
  6. and Change 200 XP SP2 t0 100 for XP SP1.
  7. By this way you can change Windows Xp Service packs 1,2,3 to whatever you want.
  8. change sp2 to sp3
Hope you all liked this very big post of Windows Xp Speedup Secrets. Please comment and Share this post.
Thanks to Prince Irongear Who contributed this article to us. Written and Modified by admin

Wednesday 24 April 2013

How ANYONE Can Replace Leaking Capacitors

I received a computer to fix from a friend. The symptoms were common with a hardware problem: Turns on every time, but freeze after 15 seconds of use (usually at windows boot-up). I opened the case and took one good look at the motherboard; sure enough, leaking capacitors:
Leak
I’ve seen it before, and read up on Abit’s troubles with leaking capacitors but never thought of the simple fix. JUST REPLACE THE CAPACITORS!
Leak
Let me get this straight: I’m not an expert in electronics. I don’t have any schooling or experience in repairing motherboards. I’m just an average computer tech student that likes a challenge. So when I was told on a message board and by Abit that only a ‘skilled technician’ with ‘proper equipment’ could replace the leaky capacitors, I took up the challenge!
KT7

Abit KT7 with leaking capacitors
“Soldering at midnight? Why Not? Eh?”
So here’s what I did:
I looked around my room for some tools:
Tools
  • Pliers
  • Mini screwdrivers
  • Solder (64-015)
  • 320 grit Sandpaper
  • Pen soldering iron (Way too big for this job!)
As I said, these are just tools I had handy. I’m sure the solder is not the correct type for my motherboard and the soldering gun is brutally large. But what the hell….
Find some good capacitors:
I found a Shuttle AV11 socket 370 board that I labeled as “dead” (I hope it WAS!), so that will be the “organ donor” for my operation. I inspected the AV11′s capacitors – 2700uF 6.3V. The capacitors that I had to replace were 2200uF 6.3V. The capacitors weren’t the same capacitance (?)(the uF part) but since the new ones had higher capacitance AND the same voltage, I assumed all would be OK.
AV11 Motherboard
AV11 Motherboard
Start Operating!
I decided to only replace the three worst capacitors on the Abit board. After that, if I didn’t completely kill the motherboard, I might continue with the rest. ;)

DAY 1: The Task

STEP 1: Remove Good Capacitors
The easiest part first.
I labeled 3 good capacitors from the AV11 board that would be removed. Place a bit of heat (or in my case, A LOT of heat from my HUGE soldering iron) to the soldering joints and presto! The capacitors come right out!
Well not really. It’s very hard to heat both pins at the same time to remove the capacitors THAT easily. I ended up heating the capacitors one pin at a time, each time moving the single pin out about a millimeter. Soon enough I had all three out.
Remove
Gone
STEP 2: Remove the Bad Capacitors
I visually inspected all the leaking capacitors on the Abit board… almost every one was leaking!! I chose the three worst.
Now removal of the three leaky capacitors – this part is a bit harder. Same concept, but I had to make sure that I didn’t apply TOO much heat to ruin the motherboard. A little while longer… but the three worst capacitors are out!
Here you can see the REAL damage from the leaking capacitors:
Old
{mospagebreak}
Paul Baggio aka Hemiboy

STEP 3: Clean Capacitor Area
I wiped down the capacitor areas as best I could. I had to use the mini screwdrivers to scrape the leaking ‘stuff’ off the motherboard. BE SURE to be gentle as to not damage the motherboard.
Scrape
STEP 4: Clean Pins on New Capacitors
I skipped this step at first. I was having a hell of a time tryng to get the new capacitor pins in the Abit motherboard. I realized that the new capacitors had solder still stuck to the pins, making the installation to their new motherboard quite the hassle.
So, I quickly took each good capacitor and cleaned the pins with sandpaper. This made the pins a bit thinner and much easier to thread into their holes.
STEP 5: Installation of New Capacitors
Wow, What a pain! This is where my cheapo Radio Shack soldering gun should get tossed out the window. What you need to do is heat up the solder from one side as you push the capacitors pins down from the other. Easier said than done.
First thing first. The capacitors HAVE to go in a certain way. You’ll notice that on the motherboard where the capacitors sit, there is a circle with one side shaded. The shaded side matched with the ‘negative’ bars on my capacitors (Just look at the existing capacitors on your motherboard if you’re not sure.) If you put them in reverse, they will explode… or so I hear ;)
Be sure to install them this one pin at a time, much like removing the capacitors. Using all of my patience, I completed the installation of all three good capacitors. I unfortunately was not able to ADD solder to the pins. My solder with my cheapo soldering gun would produce HUGE clumps of solder and ended up covering 2 or 3 pins in the area!
It took me some time to clean it up. Two of the three capacitors are a bit loose without additional solder, but won’t fall out. I thought I’d try it like this first – I can always add solder later if need be.
Done
It’s late and I don’t need any exploding capacitors to wake up my folks, so I’ll try it tomorrow.

DAY 2: The Test

Safety first! I’d recommend some safety glasses, but since mine are not, I’ll just temporarily cover my capacitors with a CD spindle cover. I have no idea what will happen!
Cover
I plugged in parts that I can afford to loose in a ‘worst case scenario’ – ATI PCI video card, 128 of SDRAM and my dying 20 GB hard drive. I pull the jumper to turn it on….. Fans start spinning…. And -’Boing’- the screen turns on! Nothing seems out of the ordinary on the motherboard, so I allow it to boot up into XP.
WHOOHOO! It didn’t freeze!
XP
In fact I’m using it right now to finish up my article! I-ROC!
So all in all – a success! About 1 hour of work and a lot of patience has paid off. I now have a WORKING motherboard, for how much longer I don’t know, but for now it works. In the future, I may tackle the remaining leaky capacitors or may reinforce the new ones I installed.
Hope this shows how an AVERAGE tech with AVERAGE tools can accomplish a seemingly difficult task.
Good Luck!

Monday 22 April 2013

List Of Windows Service And ITs functions

 Let’s see what Windows services might not be absolutely necessary, and which of them you can disable without ruining your computing experience. I recommend that you read everything we share before making any decisions.

  • Tablet PC Input Service (in Windows 7) / Touch Keyboard and Handwriting Panel Service (Windows 8): you can safely disable this service, unless you use Tablet PC. Some "Tablet PC Components" like the Snipping tool or Windows Journal will continue to function, while the Tablet PC Input Panel will not. The default startup type is Manual. You can set it even to Disabled without negatively impacting your computing experience;
  • Windows Time: if your computer doesn’t have access to the Internet then you don’t need to update the system time from online servers. You can safely disable this service. But if you do, then this service will keep your system time accurate. Safe setting: Manual;
  • Secondary logon: if you are the only user of your computer, it can be disabled. But only if you don’t plan to use more than one user account. Safe setting: Manual;
  • Fax: unless you use your computer to send or receive faxes using fax resources available on your system (for ex. by using a fax-modem), you can disable it. Safe setting: Manual;
  • Print Spooler: if you don’t have a printer attached to your computer and you don’t use virtual printers (e.g.: PDF creator, Microsoft XPS Document Writer, Snagit, etc) you can disable it. Safe setting: Manual;
  • Offline Files: unless you use the Offline Files functionality from Windows, you can disable it. Safe setting: Manual;
    NOTE: This service is available only in Windows 7 Professional, Ultimate and Enterprise. In Windows 8 it is available only in the Pro and Enterprise editions.
  • Routing and Remote Access Service: This service offers routing services to businesses in local area and wide area networks. It allows computers to dial in to the local computer in order for it to get access to the local network. On a home computer you won’t need such features. Safe setting: Manual;
  • Bluetooth Support Service: unless you use Bluetooth devices such as keyboards, mice, printers or phones, you can disable this service. Keep in mind that, if you choose to disable this service, then no Bluetooth devices will be recognized. Also, the already connected Bluetooth devices may fail to work properly. Safe setting: Manual;
  • BitLocker Drive Encryption Service: unless you use Microsoft’s Encryption Software (included in Windows 7 Ultimate and Enterprise Edition, and in Windows 8 Pro and Enterprise), you can disable this service. BitLocker Drive Encryption is a feature that allows users to protect data by providing encryption for entire volumes. Safe setting: Manual;
  • Encrypting File System:EFS provides file encryption technology for storing encrypted files on NTFS file systems. If you don’t need to encrypt data on your hard drives, it is OK to disable it. Safe setting: Manual;
  • Certificate Propagation: if you don’t use SmartCards (sometimes used in large organizations), it is safe to disable this service. Safe setting: Manual;
  • Microsoft iSCSI Initiator Service: iSCSI is an abbreviation for Internet Small Computer System Interface - an IP-based storage networking standard for linking data storage facilities. It allows client computers to access data over long distances on remote data centers, by using existing infrastructure (ex. over LAN, Internet). iSCSI devices are disks, tapes, CDs, and other storage devices on another networked computer that you can connect to. Sometimes these storage devices are part of a network called a storage area network (SAN). Unless you need to connect to iSCSI devices, it is safe to disable this service. Safe setting: Manual;
  • Netlogon: this service is not needed in a home computer. It maintains a secure channel between the local computer and the domain controller for authenticating users. Unless you are connecting to a network domain, this service will never be used. Safe setting: Manual;
  • Parental Controls (in Windows 7) / Family Safety (in Windows 8): unless you have children using your computer and you want to monitor and control their activities, this service is not required. Safe setting: Manual;
  • Remote Desktop Configuration: Remote Desktop Protocol is a protocol developed by Microsoft which provides Windows users with a graphical interface to another computer. The client used by Microsoft is called Remote Desktop Connection. If you don’t need to connect remotely to another computer or allow incoming remote connections to yours, then it is safe to disable this service. Safe setting: Manual;
  • Remote Desktop Services: same as above. Safe setting: Manual;
  • Remote Desktop Services UserMode Port Redirector: same as above. Safe setting: Manual;
  • Smart Card: Smart Cards are generally used for safety reasons in large organizations or corporations. The typical home user won’t probably need this service to be running. Safe setting: Manual;
  • Smart Card Removal Policy: same as above. Safe setting: Manual;
  • Windows Connect Now: this service is used by laptops and other mobile computers to connect to Wireless Networks. If you are on a desktop computer, you can disable this service. Safe setting: Manual;
  • Windows Firewall: This service should be disabled only if you are using a third-party security solution that provides firewall protection. Safe setting: Manual;
  • Windows Error Reporting Service: this service is used to report system errors to Microsoft. Although disabling this service won’t affect your Windows computer, letting it run when needed may help you solve problems and issues that occur on your system, by searching solutions available from Microsoft. Safe setting: Manual;
  • Remote Registry: this service enables remote users to modify the Windows Registry. Some say that having this service turned on can pose security issues, and therefore, choose to disable it. In Windows Vista and Windows 7, this service is set to a manual start by default, while in Windows 8 it is disabled. After disabling it, I encountered some problems while updating my system, so I really think that it is safe to leave it set to Manual, at least in Windows 7. Safe setting: Manual;
  • Windows Defender: if you use a third-party security solution (antivirus and antispyware), then disabling this service is a safe choice. You should also check this tutorial: Windows Defender - How to Turn it On or Off. Safe setting: Manual.

Conclusion

If you read the list above, you notice that we always mention the safest setting to be a Manual startup type. As I mentioned before, Manual startups provide a good balance. Manual services start only if they are used by your system and you won’t encounter problems. Disabling services should be done with care, only after documenting yourself and experimenting, to make sure your system is not negatively impacted.
However, there are some services that are safe to disable, depending on how you use your computer. If you don’t use certain features and you are sure you won’t use them in the future, go ahead and disable those services that you won’t need.

Friday 19 April 2013

No Display With Long Beep Problem
Some times we will face No display problems. At the same time Computer generates some Beeps. If you have basic idea on computers, This type of Problems are very easy to solve.


Generally sounds or beeps are come from Motherboard speaker. The speaker generates some beeps to show the motherboard error. so the long beep also one the error. Long beep error means that Problem with RAM. so check your RAM, is it connected with loose contact or not working.

To check the RAM, Open the left side door of the CPU, find the RAM and unlock the RAM slots, then remove the RAM. Clean the RAM and Reinsert the RAM for 2 to 3 times to RAM Slot for 2 to 3 times and start the computer. otherwise change the RAM and start the computer.
Why My Computer Is Running Very Slow


My computer is very slow. How to increase my computer speed. Sometimes office systems and our own laptops irritate us with their slow running in emergency time. Here is the quick speedup guide for slow computer users.


For instant speedup, there are two tasks you have to do. Close all the running services and delete all temporary files. Both are very important and easy for quick speedup.

To close the current services, go to task manager (right click on taskbar and click task manager), select processes tab and right click on current user unwanted services and click on end process button. Except explorer.exe, you can close all the current user services. When you click end process button you get conformation windows, just click yes. After you close all the services except explorer, system speed will better than before.
Second is delete temporary file. Go to start menu, open run and command as recent and delete all recent files, at the same way enter commands temp, prefetch, %temp% and delete all temp, prefetch, %temp% files.


These two tasks are enough to speedup you system or laptop quickly

 What Causes Computer Systems to Heat Up

While most components in your computer system generate heat, some components cause more heat than others.
For example, your Central Processing Unit (CPU) which is most in use even during normal operations is one of the main components that needs proper cooling to stay functional. Your Graphics Card (Graphics Processing Unit, GPU,) also needs special cooling, usually already built into the card itself. This is especially true for gamers, where the GPU is under a heavier load than it would normally be.

Another component that can generate large amounts of heat is the computers’ Random Access Memory (RAM). While generally this is not as much of an issue, some newer and faster RAM modules will come with a pre-assembled heat sink to help offset the extra heat that is caused by the faster speeds.
With all of these components each causing heat, they also heat each other up. A CPU’s heat might further raise the graphics card’s heat and vice versa. Heat is then dissipated through cooling mediums, including the case itself, airflow, heat sinks, etc.
Dusty Heat Sink
Above: Dusty Heat Sink
Heat can also be caused by poor airflow. If airflow is obstructed by excess dust, hot air cannot be vented out of the system, and builds up inside, as shown in the image above. Obstructed airflow can also be caused by improper orientation of fans and components being in the way.
Aside from poor airflow, improper application of thermal compounds can cause heat sinks to lose efficiency and cause more heat within the system.

So How Do You Keep Heat Under Control?

There are many ways to keep different components from overheating. I’ll go over each of the most common cooling methods used in today’s consumer computer systems — heat sinks, fans, and thermal compounds — as well as some less common cooling methods that are not yet fully mainstream, but still an important part of high-end computer systems (liquid cooling).

Heat Sinks

One of the most common cooling components is the heat sink. Heat sinks can be found on most computer components including the CPU, Graphics Cards, RAM, and other integrated circuits.
There are two types of heat sinks: passive heat sinks and active heat sinks.
CPU and chipset heat sinks
Above: CPU and chipset heat sinks
Passive heat sinks are essentially just pieces of aluminum, or more recently, copper, affixed using thermal compounds onto a computer chip that normally produces heat. Heat is then transferred through the conductive thermal compound into the metal, and is redistributed away from the chip itself. While this method works well for older CPUs and chips, newer and faster ones will require a more powerful cooling solution, such as an active heat sink.
Active heat sinks are similar to passive ones, except they have a fan attached. The fan helps to pull heat away from the heat sink allowing it to cool more effectively. You will usually see active heat sinks in graphics cards, and even larger active heat sinks in CPUs. Active heat sinks do require more care, as with the addition of a fan, dust is more susceptible to enter the heat sink and will require cleanings and care more often.

Fans

Fans, more specifically, case fans, help to cool your computer case by (usually) pulling cold air in through the front of the PC case, and blowing it out of the back.
This is not always the case though, as each PC builder has their own cooling preferences, and others may actually add in case fans causing their heating methods to be counterproductive. An example of a counterproductive fan setup would be all fans pulling air in. This can cause an excess of dust, as well as no way for heat to escape.
Case fan with blue LEDs
Above: Case fan with blue LEDs
Aside from case fans, there are also other types of fans available.
PCI slot fans, or blowers, are one way to increase the flow of air out of the back of the PC case. Hard drive (HDD) fan modules are usually made up of two small fans attached to the exposed side of an internal hard drive; this helps to pull heat away from faster or more active hard drives. Most internal power supply unites (PSUs) will have an internal fan pulling air in and another blowing air outside of the computer case. Fans can also be found as part of active heat sinks in CPUs, graphics cards, and chipsets.
The most common fan size ranges between 40mm and 140mm; though fans as large as 240mm are starting to emerge in the mass market and in specialty cases.

Water Cooling

Water cooling is generally only used in high-end systems and gaming systems.
Water dissipates heat more efficiently than heat sinks and fans. Water cooling systems consist of a pump that pumps water across multiple components within the system. Most often, water cooling systems work to actively cool the CPU and graphics card, but modular systems allow the connection to other components within the PC. Water cooling can also be much quieter than using more conventional cooling methods like fans.
Liquid cooling
Above: Liquid cooling
While there are many upsides to using water cooling, there are also a few major downsides.
Not only are water cooling systems much more complex, but they are also a more dangerous build if not done properly. Even a small leak can turn disastrous. If a leak is present, the coolant can damage internal components including the motherboard itself.

Tuesday 16 April 2013

See Command Prompt History

You can see last used commands in a session using the navigation buttons, but if you would like to see a list of all the commands, you can get it by pressing the F7 button.
f7
Alternatively, you can use the command doskey /history  to list these commands in the command prompt itself.

Friday 12 April 2013

Solving Improper Shutdown Problem

Sometimes we can’t shutdown the system properly by power problems and some other reasons.  Continues restarting is one of the common problems, actually several reasons for this restarting problem. But here I mentioned only solving improper shutdown problem.   


When you get above error screen shot for the first time, you have to select last known good configuration option. When you select the last known good configuration option for the first time, the problem will be solved. Otherwise you have to repair your operating system by using windows bootable CD or DVD.  


Some are format the system for this problem, but this problem is easy to repair. Follow the below steps to solve this problem.

STEPS:


  • Boot form windows XP bootable CD.
  • Select repair (press R)

  • In command prompt enter “chkdsk /r” command to check the errors.

  • Type exit to restart the system, after restart your system, windows will start  normally. 
Don’t format for this problem, if you format the system desktop and document files will be lost. So in this small cases just repair your system

Tuesday 9 April 2013

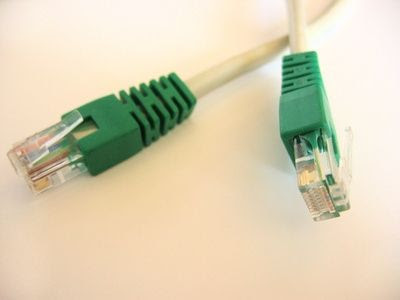
 How to connect two computers using cross over cable,
 
To connect two computers for a LAN games or file and printer sharing, its very easy! You only need one crossover cable and two network cards.
This is wired connection approach to connect two computers through cross over cable without involving other network devices, such as switch or router. It’s effective and simple way if you want to connect the computers temporary. If the network card on computers supports auto MDI/MDIX feature, you could use crossover or straight through network cable to connect both computers. If not, crossover cable is needed.

THINGS YOU WILL NEED:
two-computer-cross-over-cable cross-over-cable
 
STEPS
1. Connect the two computers through the cable.
2. Now first we name the two Computer A and Computer B.
3. Lets go on to Computer A.
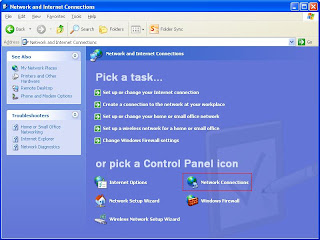
4. Go to Start> Control Panel>Network and Internet Connections and Click Network Connections
network-and-internet-connections

5.  Right Click Local Area Connection and Choose Properties
network-connections

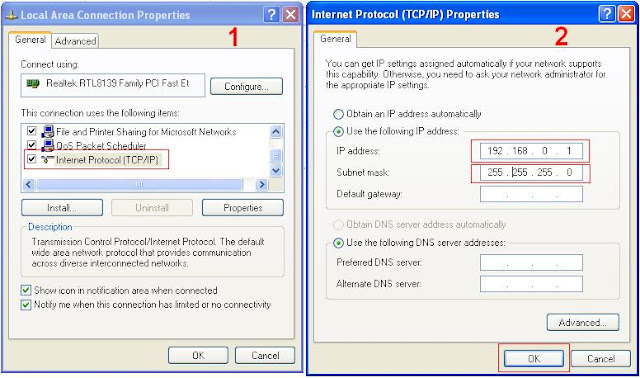
6. Double click Internet Protocol(TCP/IP. Choose Use the following IP address. Set the ip address to 192.168.0.1, Subnet Mask to 255.255.255.0 and click OK
internet-protocol-properties

7. Now that we completely setup the Computer A Let's go on to Computer B
8.The same procedure here in Computer B. Follow the steps 1-6. The only difference is the ip address. Instead of 192.168.0.1 change to 192.168.0.2 and you're done.
9. To check if you are successful setting the two computers, Go on to Computer A. Go to Start>RUN and type CMD. In the black screen type ping 192.168.0.2 and press ENTER. If successful then the result should look like on the image below.

ping

WHAT YOU CAN DO AFTER SUCCESSFULLY CONNECTING THE TWO COMPUTERS:
1. You can share your file.
2. You can play LAN GAMES.
3. You can share resources like printers.

How to Speed Up Windows 7

Ways to Speed up Windows 7fast Windows 7

Windows 7, supposedly the faster of the operating systems from Microsoft, shows gradual signs of slowing down when continually used over a long stretch.
Before installing this operating system on your computer, you should make sure that your computer meets the following basic requirements:
  • Processor: 1 Ghz or faster 32-bit (x86) or 64-bit (x64)
  • RAM: 1 GB (32-bit) or 2 GB (64-bit)
  • Available Hard Disk Space: 16 GB (32-bit) or 20 GB (64-bit)
  • Graphics Device: DirectX 9 with WDDM 1.0 or a higher driver
If your computer meets the aforementioned requirements then you can go ahead and install Windows 7 on your computer.
Steps:
  • Shutting-it-down:The proper system configuration is a necessity for the speedy functioning of the system, but again it is not the only factor effecting the computer's performance. The system tends to slow down even if used over a prolonged period of time. As such, you should make sure that you give your computer a bit of "rest" at least once every week and completely shut it down.
  • Periodically delete the temporary files from your PC: This helps the applications to run faster on your system. For this type %Temp% in the run dialog box and press "OK". A new folder will open up with the name "Temp" on the top menu bar. Here click Edit–>Select All and then File–>Delete.
  • Perform a scandisk: This test checks if your drive is in a healthy condition and also helps your computer run faster.
  • Defragment the drives:Even though Windows 7 is said to be the smarter and more efficient OS, it still suffers from disk fragmentation when involving allocation of free space to files on a magnetic disk. Consequently, more time is spent when inputting/outputting the files when the disk is highly fragmented. Thus, a regular disk defragmentation is necessary.To defragment the disk goto Start–>All Programs–>Accessories–>System Tools–>Disk Defragmenter. Here, you can select the volume to be defragmented and the click "Analyze" and then "Defragment" to begin the disk defragmentation.You can select to defragment the volume one by one or all at once.

Monday 8 April 2013

How to Configure Virtual Private Network (VPN) in Windows XP,Vista and Windows Server 2003


VPN is nothing but Virtual Private Network,many large Organizations using this Technology to give access to their Employees from a Distance Location.It means Virtual Private Network is nothing but Accessing a Private network through a Public Network in a Highly Secure way.
Lots of people still depending on Third Party Applications to configure VPN,but in my opinion it is not necessary you Directly configure this feature in  Windows XP,Vista,Windows Server 2003 and 2008.It just takes 10 to 15 minutes to configure VPN.
Here I am explaining with the Example of Windows Server 2003,the remaining XP ,Vista and others having the Similar Configuring methods.Here we go..
Setting up and Configuring a Virtual Private Network (VPN) on a Windows Server:
  1. Click on “Start Menu,” then “Settings and Network Connections.”
  2. Choose to “Create New Connection,” then click “Next”.
  3.  Choose the last option, “Setup Advanced Connection,” in the Network Connection Type box.
  4. Select “Accept Incoming Connections” in the Advanced Connection box. You will then click “Next” through two more boxes.
  5. Check “Allow Virtual Private Connections” and click “Next”.
  6. Select an existing user or create a new user, so Windows will have a username and password to use for the VPN.
  7. Click “Next” and “Finish” after selecting all the users you wish to give access to.
  8. Right-click the “Incoming Connections” icon in the Network Connections Folder and then select “Properties”.
  9. Select the “Networking” tab and choose “TCP/IP protocol.” Click on “Properties” and then click “Specify IP Address.” This is where you choose addresses where users will connect to the VPN. To do this properly, you need to know where your router applies Dynamic Host Control Protocol (DHCP) settings, which is the sequential numbers your router assigns internally to new users. Most start at the bottom and go up to about 100. Let’s use the example of a standard home router that would give you a range of 192.168.0.1 to 192.168.0.99 for your DHCP. In this example, under “Specify IP Address”, you might choose 192.168.0.100 to 192.168.0.110. This gives you 10 IP addresses available for new users. You can assign more or less depending on how many users you want to access the VPN at any given time.
  10. In this same window, you have the option to allow the computer to assign its own IP address. Selecting this option is not necessary, because you’ve just assigned IP addresses for your users.
  11. Log in to the router, assuming your router is also your hardware firewall. Look for a tab listed as “Advanced Options” or “Port Forwarding” or “Gaming.” Once you’ve found it, you must forward Port 1723 and Port 500 (both TCP and UDP) to the computer that has your VPN server on it. These should be forwarded to the IP address of the VPN server computer you just configured. If you’re not sure what that IP address is, go to the computer, click “Start,” then “Run.” Type “CMD” in the black window, then type “IPCONFIG/all.” This command gives you the IP address of the server computer.
  12.  Click “Save” in router configuration and restart the router. The server should now allow connections without changing the firewall. If you’re using a software firewall and an external firewall, you may want to consider disabling the software firewall, unless you are on a less secure public internal network. If you need to use a software firewall, check your user instructions for allowing exceptions, and allow exceptions on the ports listed above.
Setting Up Client Side Configuration for Virtual Private Network (VPN) :
  1. Right-click “Network Connections” on your desktop.
  2. Choose “Create A New Connection”.
  3. Choose “Connect to the Network at My Workplace” from the options shown. Click “Next”.
  4. Choose “VPN”, then click “Next”.
  5. Name your VPN connection if you choose to. This will not affect how the VPN works; the name is strictly for your own reference. Click “Next”.
  6. Choose “Do Not Dial the Initial Connection” and click “Next”.
  7. Enter the external IP address of the VPN server. Your Computer Administrator will Provide this IP.
  8. Select “My Use Only” or “Everybody on This Computer,” depending on your preference, then click “Next”.
  9. Add a shortcut for this connection to your desktop. Click “Finish”.
 So this is all about How to Configure Virtual Private Network (VPN).
Windows 8 Features and Hardware Requirements


The highly awaited Windows 8 is next generation operating system for your windows computers. It works on Desktops and Laptops along with Tablets and it is one operating systems for all. It kind of looks like a tablet operating system at first but it will be fully functional with mouse and keyboard. After four months of release of "Consumer Preview", Microsoft finally released a Windows 8 "Release Preview", it is a pre-release version of Windows 8. 
Microsoft strongly recommend that only experienced PC users download Windows 8 Release Preview as the software is still in development state.
System Requirement

Windows 8 Release Preview works great on the same hardware as that of Windows 7:
Processor: 1 gigahertz (GHz) or faster
RAM: 1 gigabyte (GB) (32-bit) or 2 GB (64-bit)
Hard disk space: 16 GB (32-bit) or 20 GB (64-bit)
Graphics card: Microsoft DirectX 9 graphics device with WDDM driver
Additional requirements to use certain features:
To use touch, you need a tablet or a monitor that supports multitouch.
To access the Windows Store and to download and run apps, you need an active Internet connection and a screen resolution of at least 1024 x 768.
To snap apps, you need a screen resolution of at least 1366 x 768.
Internet access (ISP fees might apply)
New release comes with new Features and Changes
  • It includes Internet Explorer 10 which provides users with more choices and control over their privacy
  • Internet Explorer 10 has built in Adobe Flash Player
  • Updated Bing Apps, Weather, Maps and Finance with three new additions News, Sports, and Travel
  • Improvements to Photos, Mail and People apps since the Consumer Preview
  • New and Increased personalization options for the Start screen
  • Improved multi-monitor support
  • Refinements to the way people find and download apps through the Windows Store
  • New Family Safety features

Saving credentials for ‘NET USE’ command

PĂ«rforming a ‘net use’ to a standalone computer or a computer outside your domain will cause a prompt for credentials. You’ll need to provide these credentials for each reconnect.
It is possible to invoke the ‘stored user names and passwords’ feature (Windows XP) even from the command promt.
For the net use command to save the credentials in Credential Manager just use the /savecred switch. Just remind that you can’t use the ‘*’ in the command to cause an explicit password prompt (you will be prompted for the password anyway).
Example:
for save  - net use * \\computer\share /savecred

 For Delete - net use \\computer name /del

Friday 5 April 2013

Intel Vs AMD

 Intel and AMD both are best processor Manufacture companies. there are small variations of both. actually lot of people don't know what AMD is. some purposes AMD is better than Intel. Compared with AMD, Intel is best for Home and Office purpose. Compared with Intel, AMD is best for Animation, Graphics and Games purpose.

Intel:
Intel Processors are best for maximum all purposes. It generates low heat then AMD Processors. No need to maintain Air Conditions or additional Fans.
AMD:
AMD Processors are better for 3D Animation, Graphics and 3D Gaming purpose then Intel Processors. It generates more heat then Intel Processors. Air Conditions needed to this Processors. AMD processors supported Motherboards are rare. so whenever motherboard is in problem, it is very difficult to purchase. because latest motherboard are in market only. they won't support your old processors. so that all are prefer Intel.

Processor and Its Specifications 

Processors and its specifications are very important, when you buy a PC. but how to we find a processor specifications? there are so many ways to know specifications of a PC. but here we discuss about processor only.


Any processor we find the specification on top of the processor. see the above image, in this processor we see some indications. in this processor A is a processor name (Intel Core 2 Duo) Intel is the Company name and Core 2 Duo is the processor version name, B is clock speed or processor speed (2.66GHz), C is Level 2 Cache Memory (6MB), D is FSB speed (1333) and E is Core Voltage (0.6 Volts). these are the specification on top of a processor.

SOLUTION FOR MOTHERBOARD BIOS SAVING PROBLEM
1. CMOS Battery jump check (if any) have been set correctly.
2. Damaged circuit voltage for IC memory configuration. See Fig.
3. IC-rather die, or IC-welded foot rot.

Tuesday 2 April 2013

Your System Is Running Low On Virtual Memory


New computers today usually have a minimum of 512MB of memory installed with WiFi networking capability, but when the total of temporary details that needs storing surpasses the memory they write some of it the hard disk. The space used to allocate this is known as virtual memory. If this space has not been set up correctly, it will start to complain. It's usually best to let Windows decide how much virtual memory should be available. In order to do this, right-click on My Computer and select Properties. Select on the Advanced tab, under Performance, click the Settings button. Click on the Advance tab once more and, at the bottom, click Change. Make sure that the 'System managed size' option is selected and click the Set button. Finally, click OK and restart the PC.

Every Admin Should Know These Commands Active Directory 1.   To quickly list all the groups in your domain, with members, run this c...