starclick

Monday, 8 April 2013

How to Configure Virtual Private Network (VPN) in Windows XP,Vista and Windows Server 2003


VPN is nothing but Virtual Private Network,many large Organizations using this Technology to give access to their Employees from a Distance Location.It means Virtual Private Network is nothing but Accessing a Private network through a Public Network in a Highly Secure way.
Lots of people still depending on Third Party Applications to configure VPN,but in my opinion it is not necessary you Directly configure this feature in  Windows XP,Vista,Windows Server 2003 and 2008.It just takes 10 to 15 minutes to configure VPN.
Here I am explaining with the Example of Windows Server 2003,the remaining XP ,Vista and others having the Similar Configuring methods.Here we go..
Setting up and Configuring a Virtual Private Network (VPN) on a Windows Server:
  1. Click on “Start Menu,” then “Settings and Network Connections.”
  2. Choose to “Create New Connection,” then click “Next”.
  3.  Choose the last option, “Setup Advanced Connection,” in the Network Connection Type box.
  4. Select “Accept Incoming Connections” in the Advanced Connection box. You will then click “Next” through two more boxes.
  5. Check “Allow Virtual Private Connections” and click “Next”.
  6. Select an existing user or create a new user, so Windows will have a username and password to use for the VPN.
  7. Click “Next” and “Finish” after selecting all the users you wish to give access to.
  8. Right-click the “Incoming Connections” icon in the Network Connections Folder and then select “Properties”.
  9. Select the “Networking” tab and choose “TCP/IP protocol.” Click on “Properties” and then click “Specify IP Address.” This is where you choose addresses where users will connect to the VPN. To do this properly, you need to know where your router applies Dynamic Host Control Protocol (DHCP) settings, which is the sequential numbers your router assigns internally to new users. Most start at the bottom and go up to about 100. Let’s use the example of a standard home router that would give you a range of 192.168.0.1 to 192.168.0.99 for your DHCP. In this example, under “Specify IP Address”, you might choose 192.168.0.100 to 192.168.0.110. This gives you 10 IP addresses available for new users. You can assign more or less depending on how many users you want to access the VPN at any given time.
  10. In this same window, you have the option to allow the computer to assign its own IP address. Selecting this option is not necessary, because you’ve just assigned IP addresses for your users.
  11. Log in to the router, assuming your router is also your hardware firewall. Look for a tab listed as “Advanced Options” or “Port Forwarding” or “Gaming.” Once you’ve found it, you must forward Port 1723 and Port 500 (both TCP and UDP) to the computer that has your VPN server on it. These should be forwarded to the IP address of the VPN server computer you just configured. If you’re not sure what that IP address is, go to the computer, click “Start,” then “Run.” Type “CMD” in the black window, then type “IPCONFIG/all.” This command gives you the IP address of the server computer.
  12.  Click “Save” in router configuration and restart the router. The server should now allow connections without changing the firewall. If you’re using a software firewall and an external firewall, you may want to consider disabling the software firewall, unless you are on a less secure public internal network. If you need to use a software firewall, check your user instructions for allowing exceptions, and allow exceptions on the ports listed above.
Setting Up Client Side Configuration for Virtual Private Network (VPN) :
  1. Right-click “Network Connections” on your desktop.
  2. Choose “Create A New Connection”.
  3. Choose “Connect to the Network at My Workplace” from the options shown. Click “Next”.
  4. Choose “VPN”, then click “Next”.
  5. Name your VPN connection if you choose to. This will not affect how the VPN works; the name is strictly for your own reference. Click “Next”.
  6. Choose “Do Not Dial the Initial Connection” and click “Next”.
  7. Enter the external IP address of the VPN server. Your Computer Administrator will Provide this IP.
  8. Select “My Use Only” or “Everybody on This Computer,” depending on your preference, then click “Next”.
  9. Add a shortcut for this connection to your desktop. Click “Finish”.
 So this is all about How to Configure Virtual Private Network (VPN).
Windows 8 Features and Hardware Requirements


The highly awaited Windows 8 is next generation operating system for your windows computers. It works on Desktops and Laptops along with Tablets and it is one operating systems for all. It kind of looks like a tablet operating system at first but it will be fully functional with mouse and keyboard. After four months of release of "Consumer Preview", Microsoft finally released a Windows 8 "Release Preview", it is a pre-release version of Windows 8. 
Microsoft strongly recommend that only experienced PC users download Windows 8 Release Preview as the software is still in development state.
System Requirement

Windows 8 Release Preview works great on the same hardware as that of Windows 7:
Processor: 1 gigahertz (GHz) or faster
RAM: 1 gigabyte (GB) (32-bit) or 2 GB (64-bit)
Hard disk space: 16 GB (32-bit) or 20 GB (64-bit)
Graphics card: Microsoft DirectX 9 graphics device with WDDM driver
Additional requirements to use certain features:
To use touch, you need a tablet or a monitor that supports multitouch.
To access the Windows Store and to download and run apps, you need an active Internet connection and a screen resolution of at least 1024 x 768.
To snap apps, you need a screen resolution of at least 1366 x 768.
Internet access (ISP fees might apply)
New release comes with new Features and Changes
  • It includes Internet Explorer 10 which provides users with more choices and control over their privacy
  • Internet Explorer 10 has built in Adobe Flash Player
  • Updated Bing Apps, Weather, Maps and Finance with three new additions News, Sports, and Travel
  • Improvements to Photos, Mail and People apps since the Consumer Preview
  • New and Increased personalization options for the Start screen
  • Improved multi-monitor support
  • Refinements to the way people find and download apps through the Windows Store
  • New Family Safety features

Saving credentials for ‘NET USE’ command

PĂ«rforming a ‘net use’ to a standalone computer or a computer outside your domain will cause a prompt for credentials. You’ll need to provide these credentials for each reconnect.
It is possible to invoke the ‘stored user names and passwords’ feature (Windows XP) even from the command promt.
For the net use command to save the credentials in Credential Manager just use the /savecred switch. Just remind that you can’t use the ‘*’ in the command to cause an explicit password prompt (you will be prompted for the password anyway).
Example:
for save  - net use * \\computer\share /savecred

 For Delete - net use \\computer name /del

Friday, 5 April 2013

Intel Vs AMD

 Intel and AMD both are best processor Manufacture companies. there are small variations of both. actually lot of people don't know what AMD is. some purposes AMD is better than Intel. Compared with AMD, Intel is best for Home and Office purpose. Compared with Intel, AMD is best for Animation, Graphics and Games purpose.

Intel:
Intel Processors are best for maximum all purposes. It generates low heat then AMD Processors. No need to maintain Air Conditions or additional Fans.
AMD:
AMD Processors are better for 3D Animation, Graphics and 3D Gaming purpose then Intel Processors. It generates more heat then Intel Processors. Air Conditions needed to this Processors. AMD processors supported Motherboards are rare. so whenever motherboard is in problem, it is very difficult to purchase. because latest motherboard are in market only. they won't support your old processors. so that all are prefer Intel.

Processor and Its Specifications 

Processors and its specifications are very important, when you buy a PC. but how to we find a processor specifications? there are so many ways to know specifications of a PC. but here we discuss about processor only.


Any processor we find the specification on top of the processor. see the above image, in this processor we see some indications. in this processor A is a processor name (Intel Core 2 Duo) Intel is the Company name and Core 2 Duo is the processor version name, B is clock speed or processor speed (2.66GHz), C is Level 2 Cache Memory (6MB), D is FSB speed (1333) and E is Core Voltage (0.6 Volts). these are the specification on top of a processor.

SOLUTION FOR MOTHERBOARD BIOS SAVING PROBLEM
1. CMOS Battery jump check (if any) have been set correctly.
2. Damaged circuit voltage for IC memory configuration. See Fig.
3. IC-rather die, or IC-welded foot rot.

Tuesday, 2 April 2013

Your System Is Running Low On Virtual Memory


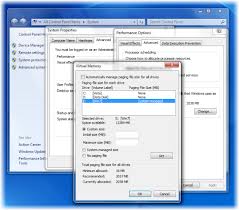
New computers today usually have a minimum of 512MB of memory installed with WiFi networking capability, but when the total of temporary details that needs storing surpasses the memory they write some of it the hard disk. The space used to allocate this is known as virtual memory. If this space has not been set up correctly, it will start to complain. It's usually best to let Windows decide how much virtual memory should be available. In order to do this, right-click on My Computer and select Properties. Select on the Advanced tab, under Performance, click the Settings button. Click on the Advance tab once more and, at the bottom, click Change. Make sure that the 'System managed size' option is selected and click the Set button. Finally, click OK and restart the PC.

Every Admin Should Know These Commands Active Directory 1.   To quickly list all the groups in your domain, with members, run this c...