Ethernet Media Standards
Ethernet, Fast Ethernet and Gigabit Ethernet, are identified by three-part names, which is also known as Media Standard. An example of Media Standard is 10BASE-T. The first part of the Media Standard specifies the transmission speed (10, in this case specifies 10 Mbps)
The second part of the name "BASE" specifies that the Ethernet signal is a Basebandsignal.
The final part of the Ethernet Media Standard specifies the kind of cable used. Here "T" specifies twisted-pair cable. The following table shows the common Ethernet Media Standards.
|
Monday, 4 August 2014

IEEE 802 Standards
The IEEE 802 Standards comprises a family of networking standards that cover the physical layer specifications of technologies. The following tables show the most popular IEEE 802 Standards.
Standard
|
Description
|
|---|---|
802.1
|
Internetworking
|
802.2
|
Logical link control
|
802.3
|
Ethernet
|
802.4
|
Token bus
|
802.5
|
Token ring
|
802.6
|
Metropolitan area network (MAN)
|
802.7
|
Broadband technology
|
802.8
|
Fiber-optic technology
|
802.9
|
Voice and data integration
|
802.10
|
Network security
|
802.11
|
Wireless networking
|
802.12
|
Demand priority networking
|
Ethernet Standards
Standard
|
Description
|
|---|---|
802.3
|
Ethernet CSMA /CD (10 Mbps)
|
802.3u
|
Fast Ethernet (100 Mbps)
|
802.3z
|
Gigabit Ethernet over fiber-optic cabling or coaxial cabling
|
802.3ab
|
Gigabit Ethernet over twisted-pair cabling
|
802.3ae
|
10-Gigabit Ethernet
|
Thursday, 8 May 2014
Hack administrator from Guest account
- Go to C:/windows/system32
- Copy cmd.exe and paste it on desktop
- rename cmd.exe to sethc.exe
- Copy the new sethc.exe to system 32,when windows asks for overwriting the file,then click yes.
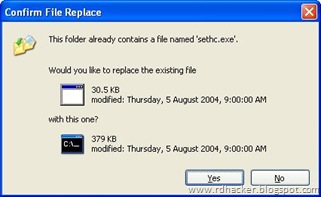
- Now Log out from your guest account and at the user select window,press shift key 5 times.
- Instead of Sticky Key confirmation dialog,command prompt with full administrator privileges will open.

- Now type “ NET USER ADMINISTRATOR aaa” where “aaa” can be any password you like and press enter.
- You will see “ The Command completed successfully” and then exit the command prompt and login into administrator with your new password.
- Congrats You have hacked admin from guest account.
Thursday, 3 April 2014
How to speed up SATA hard drives
Speed up SATA hard drives
In Windows, by default, the advanced write caching feature of SATA hard drives is not enabled. To enable it, write ‘devmgmt.msc‘ in start menu search bar and hit enter to open the Device Manager.

In the left side, select Disk Drives and rightt-click on it.

Open its Properties and go to Policies tab.

There select Enable Advanced Performance.
Click OK.
Wednesday, 2 April 2014
How to identify unsigned drivers using sigverif utility in Windows XP | 8 | 7
A Device Driver is a program that controls or helps operate a hardware device. When 3rd-party vendors create a new driver, it can be submitted to Microsoft for “Device Signing“. This ensures the quality. To help maintain the integrity of your Windows operating system, critical files are digitally signed so that any changes to these may be easily detected. However, not all drivers are digitally signed, as a result of which some of them may cause system instability.
Identify unsigned & digitally signed Drivers
File Signature Verification Tool or sigverif
Microsoft has a tool in place in Windows 8 | 7 and Windows Vista calledsigverif.exe or the File Signature Verification Tool which helps you identify unsigned drivers.
To access it, type sigverif in Windows search and hit Enter.

Click Start. The program will scan all the device drivers.

On completion of the scan, it will list down those which are not digitally signed. In my case since all were digitally signed, I received the following message.

Should you wish to see the list of all the drivers scanned, Click on Advanced & select View Log.

You will be able to view the log.

DirectX Diagnostic Tool or DxDiag.exe
To verify if your Drivers are digitally signed, you can run the DirectX Diagnostic Tool. To do so, type DxDiag.exe in the Search Box and hit Enter. The DirectX Diagnostic Tool is designed to help you troubleshoot DirectX-related issues.

The DirectX Diagnostic tool (DXDiag.exe) gathers information about the system and the DirectX installed components. It also provides a number of tests to ensure that components are working properly. Use the diagnostic tool to create a report about your computer by running Dxdiag.exe and clicking on the Save All Information button.
Wednesday, 5 March 2014
How to Turn On Auto-Complete in the Command Prompt
Do you use the command prompt on a daily basis? If you do, then this tip is definitely for you! I recently found out that there is a way to turn on auto-complete for the command prompt via a simple registry hack. So that means if you are typing in a long path, simply type in the first few letters and then press TAB to auto-complete.
For example, if I am typing in C:\Documents and Settings\, I would just need to type inC:\Doc and then press the TAB key.
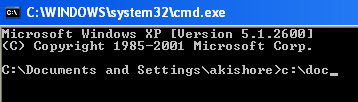

As you can see, there is only one option that starts with “doc”, so it’s automatically filled along with quotes since it has spaces in the path! Now that’s pretty neat. I always loved using auto-complete in Windows Explorer or even in Open and Save dialogs, but never knew it could be done in the command prompt also.
You can also browse through the different folders and files in a directory by simply pressing the TAB key. So if you type in C:\ and then keep pressing the tab key, you will be able to cycle through all the folders and files in that path in alphabetical order, i.e. C:\Documents and Settings, C:\Program Files\, etc.
How to enable auto-complete for command prompt
Step 1: Click on Start, then Run and type in regedit
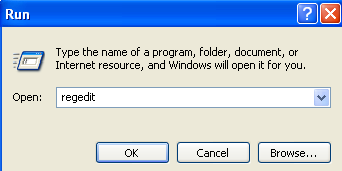
Step 2: Navigate to the following registry key:
HKEY_LOCAL_MACHINE\SOFTWARE\Microsoft\Command Processor
Step 3: Double-click on the “CompletionChar” key and change the value to 9
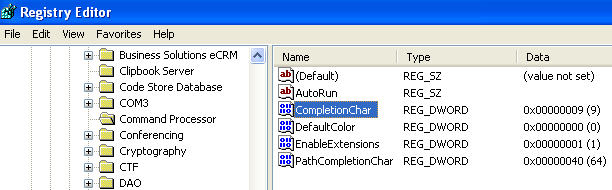
Now close regedit and open the command prompt. Start typing in a partial path and then press TAB to auto-complete it! Pretty sweet eh! Great for anyone who has to work with the command prompt a lot. Enjoy!
Install Windows 8 Apps without the Store
These steps will work for Windows 8 and Windows 8.1.
1. Search for “Run” from the Windows Start screen and click on it to open its command prompt.
2. Type in “
gpedit.msc” and click “OK.”
3. From the main screen of the Local Group Policy Editor, you want to head to the following entry:
4. Right-click on “Allow all trusted apps to install.”
5. You’ll want to enable this entry to all non-Windows Store apps to install in Windows 8. Make sure to click “Apply,” then “OK” to change the entry’s settings.
Before you install any non-Windows Store apps, they still must meet two criteria:
- The developer must cryptographically sign the app
- Your computer must be able to accept the certificate
6. If the app meets these two conditions, then you’ll want to use Windows PowerShell to run the following command:
“app1.appx” is the app you want to install, you’ll need to change this as necessary depending on how it’s named.
“winjs.appx” is the dependency for the app, which you’ll also need to change if necessary. The dependency will be included with the app.
Now, you’re ready to use your new non-Windows Store app on Windows 8.
Make sure you’re only installing these apps from trusted sources and always keep aWindows 8 system recovery image or backup handy in case you run into issues.
Subscribe to:
Posts (Atom)
-
 SMPS Problems and Solutions SMPS SMPS Internal What is SMPS ? SMPS - Switched Mode Power Supply. An SMPS is a Device to ...
 -
 Connecting Front Panel Connectors - Power Switch, Power LED, HDD LED and Reset Switch Front Panel Connectors are come with cabinet. T...
 -
The security log on this system is full. Only administrators can log on to fix the problem This issue occurs because no more events can...